CONTENTS OF THE ARTICLE
2. Basic information of the contract
3. Products
4. Invoicing
5. Verification
6. Document (Contract template)
7. Preview
1. Creating a contract
You can create new contracts on the "Contracts" tab by clicking the "+Contract" button. You can also click the "+Contract" button in the navigation bar that is always visible when you are on the management side of Koho.

The contract form has five tabs: basic information, products, invoicing, verification and document. The preview tab opens the contract document into a preview window.

2. Basic information of the contract
On the first tab, you can give basic information about the contract. Name and customer are mandatory fields. You can add an existing customer by using the "Customer search" option or create a new customer from the "+ New customer" button. This means that you don't have to create the customer before creating a contract because you can create them at the same time. As you save the contract, the customer information is also saved to Koho. Read more about creating customers from this article: 3.1.1 Creating a customer.
If you edit customer information while creating a contract, the changes are saved to Koho. This is handy if you e.g. notice that the invoicing or delivery address of the customer has changed and you can update them right away.

You can also give the following information about the contract:
- Comment: Internal comment for detailed information.
- Responsibilities: You can define responsible persons for the contract and their role. Seller is the first responsible person as a default.
3. Products
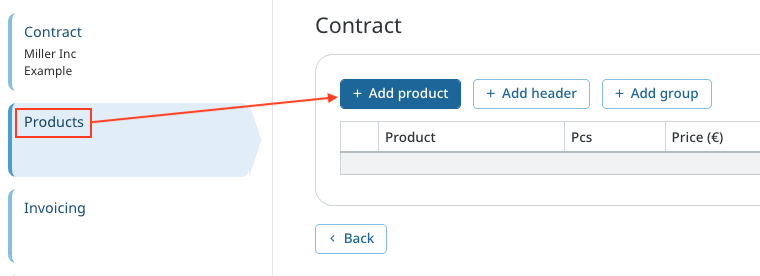
When you click the "+Product" button, the "Select products and services" window is opened. You can find the desired products from the list or use the search bar to find them. A product is selected by clicking the "+" sign next to its name. You can also add product bundles to the contract by clicking the "Open / Close" link. After you have selected all the desired products, click on the "Add selected products" button.

Now you can see the products listed on the "Products" tab. Click the product row to open additional information fields. There you can make the following definitions:
- Name: Name of the product that is shown on the contract.
- Invoice description: A description that is shown on the customer's invoices.
- Internal description: An internal description that is only visible internally.
- VAT%: Percent for value added tax
- Cost: Cost of the product to your company. Costs are used e.g. when calculating sales margin.
- Price for term: You can determine a price for invoicing term. This way the amount of products is not multiplied with the invoicing term. For instance, if the customer is invoiced yearly, the invoice says 1x1488€, not 12x124€. Price for term can only be defined for recurring products.
- Discount: A discount to the defined price. You change discount to euros by clicking on the percent sign.
- Periodic discount: Functions in the same way as regular discount but the discount period is defined.
- Accounting account: You can define an accounting account for the product.
- Accounting target: You can define an accounting target for the product.
- Term: If the product needs to be invoiced only for a certain period, you can define the start and end dates for the invoicing. For instance, if you have a product called "Deployment" that is invoiced only for the first three months of the contract, you can define the end date accordingly.
- Schedule changes: You can schedule a change to the product's amount or price to happen on a certain day.

You can also add subheadings to the contract product table and, if necessary, groups to group products. In addition, the "Actual billing" setting of the group can be used to determine whether an invoice is automatically generated for the products in the group or whether the product is charged according to the actual amount.
Note: The subheadings and product groupings defined in the contract product table are visible in, for example, the document formed from the contract, but they are not visible, for example, on the invoice formed from the contract.

4. Invoicing
On the invoicing tab you can define billing information for the contract. If your contract includes single products, you can define a billing date and payment for them.
For the recurring products, you can make the following definitions:
- In effect you can define whether the contract is in effect indefinitely or definitely. For a definite contract, you must define the start and end date, or define the length of the contract in months or years.
- Invoicing begins on choose the date when the invoicing of the contract begins.
- Billing interval billing interval of the contract in months.
- Schedule cutoff date (optional) cutoff date can be used in situations where the contract begins in the middle of a desired invoicing term. In the example below, the invoicing begins on the 14th of June and the cutoff date is set to 1st of July. After the first term, the invoicing term changes as the month changes. If you select the "Consolidate" option, you can invoice the whole cutoff term in a single invoice, even if it is longer than the billing interval.
- Billing define whether the billing happens upfront or afterwards.
- Billing date offset you can move the billing date forwards/backwards in relation to starting/ending date of the term being invoiced.
- Invoice generation defined how many days before the billing date the invoice is generated.
For the products with periodic billing, the "Invoice term preview" will also automatically display a preview of the contract's upcoming invoicing periods based on your invoicing settings.

You can also define other necessary invoicing details: payment term, billing charge (automatically added to the invoice), invoice description and references. You can also define wether the invoices are approved automatically and add information that is specific for semantic invoices.

5. Verification
On the "Verification" tab you can define whether the contract has been verified by the customer. An unverified contract cannot be activated for invoicing.
From the "Verification level" menu, you can choose how the contract was verified - verbally, by email or by signature. You can also choose "Unverified" if the customer has not yet verified the contract. To the "Comment" field you can give a description of the verification if it is necessary. From the "+File" button you can add a file.

6. Document (Contract template)
Contract templates can be used when you want to send contract documents straight from Koho to your customer. If this is not necessary for your company, you can ignore this tab and the preview tab, and save the contract.
Contract templates (and other possible templates) are always customised to your company's needs and visual appearance. For this reason, building contract templates is always charged according to our current price list. If you would like to use this feature, please contact our customer service at asiakaspalvelu@kohosales.com to get started.
If your company already has a contract template, on the "Document (Contract template)" tab you can make changes to it.
From the "Choose template" section you can choose which template you want to use (if your company has several templates). You can also choose the file format. Pdf documents are the default value. From the "Page" breaks section you can define in which parts of the document there will be a page break. To the "Custom fields" you can write some text or add clauses from the "Add clause" button. Clauses are predetermined parts of document templates which make it a lot faster to create contracts because you don't have to write repeating parts every time you are creating a contract. Clauses are managed on the "Clauses" page that is on the "Documents" section in settings.

You can also add clauses from the "Clauses" tab. If there are default clauses for the contract template, they are also shown on this page.

On the "Attachments" tab you can add attachments to the contract template.
- From the "Open menu" button you can see all attachments that have been saved to your company's Koho account. Attachments are managed in "Settings" on the "Document" section's "Attachments" tab.
- From the "Upload file" you can upload a new file to the contract. The file has to be in pdf format.

You can preview the contract from the "Preview" tab. The preview opens into a new tab. The picture below is just an example, in the actual preview you can see your company's customised template.

Finally you can save the contract. The contract needs to be activated in order for the contract invoicing to begin. This is covered in more detail in this article: 5.2.2 Activating the invoicing of a contract and the invoicing terms tab
Do you have further questions about contracts? Please contact our customer service at asiakaspalvelu@kohosales.com so we can assist you.