Contents of the article
2. "Weekly" view
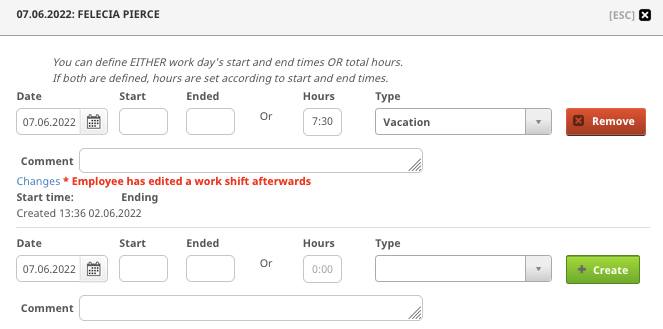
3. Editing working time entries
4. "Cumulative" view
1. Following and editing work-time clock entries and flexitime
You can follow working time entries and employee-specific flexitime on the "Management" section of Koho. Go to the "Reports" section and then choose the "Working days" tab. To be able to follow flexitime in Koho, you need to set working hour targets for employees. Read more about employee-specific working hour targets from this article: 3.7.1 Setting hour targets when using the work-time clock
On the "Working days" page there are two options for viewing working time entries: "Weekly" and "Cumulative".
2. "Weekly" view
From the "Weekly" view you can view working time entries for each employee on a daily basis. You can change week by choosing a date from the calendar or by clicking the arrows next to the date. You can filter the table by teams or working time types (read more about working types from this article: 3.8.5 Managing working time types). If you choose the "Include non-cumulative" selection, you can also see entries that are non-cumulative.
If you want to edit or take a closer look of the working time entries, click the desired day from the table to open a daily view.

If the users have edited the working time entry (for exampled manually changed the start time or made a retrospective entry) there is a red star on all those cells on the "Weekly" view. This way it is easy to see which entries might need checking. A more specific edit log is visible when the daily view is opened.

3. Daily view
Once the daily view has been opened, you can see all working time entries for the selected day. In this view it is also possible to edit the entries. This is covered in more detail in this article: 3.8.3 Editing working time entries
4. "Cumulative" view
Flexitime can be followed on the "Cumulative" view of the "Working days" section.
Overall situation of flexitime for all employees:
The overall situation of flexitime can be followed from the "Summary (excel)" link at the top of the page. The excel file shows flexitime for all employees until the selected end date. The end date is selected when you click the link. If you want to follow how flexitime has changed between different months, you can click the "Diff (excel)" link.

Flexitime for a single employee:
Choose the desired year and employee from the menu at the top of the page. On the "Total hours" field you can see a sum of all cumulative working time entries for the selected year. On the "Differential" field you can see the cumulative flexitime for the selected year (cumulative working time entries minus working time hour targets). The "Total" field shows the cumulative flexitime also from previous years.
On the middle of the page you can see how working time and flexitime have accumulated on a monthly basis. By clicking a month, you can see them on a weekly and a daily basis.

If the flexitime is green, the employee's working time entries for the day (month) are equal to or higher than the working hour targets. If the flexitime is red, it means that the cumulative working time entries are lower than the working hour targets, and the flexitime is negative. The little green number next to the flexitime shows the amount of working time for that day (month) and the little red number shows the working hour targets. The little gray number below the flexitime shows the total cumulative flexitime on that day.
Clicking a day on the "Cumulative" view opens a similar daily view that was presented earlier in this article. On this view you can edit the working time entries. This is covered in more detail in this article: 3.8.3 Editing working time entries.
On the top right corner of the page, you can see the following three buttons (depending the settings on your account).

- Fix hours: With this button you can make negative or positive entries to fix errors in the flexitime for the selected employee for the selected date.
- + Holiday: If your company is using Koho to manage annual holidays, with this button you can add annual holidays for the selected employee.
- + Add shift: With this button, you can add working time entries for the selected employee.
If you need further information on this subject, please contact our customer service at asiakaspalvelu@kohosales.com.